Subscribe to our Newsletter!

Showing posts with label kitchen. Show all posts

Sunday, January 5, 2020

Kitchen Renovation of our 1980s Contemporary Home - Must See Before and After!

Wow!  It's been a while!  We've been busy with renovations of the 1980s contemporary home we purchased in Fall of 2018.

We finally finished the kitchen renovation!  It was a long process, mainly because of the backsplash I chose.  I've learned when selecting materials for your renovation, always check availability.  The backsplash we ordered took FOUR months to have cut, shipped, and installed.

I can't wait to show you after photos of the kitchen but, first, let's go back to what we started with.  Here are the befores (straight from the MLS with the previous owner's decor :)
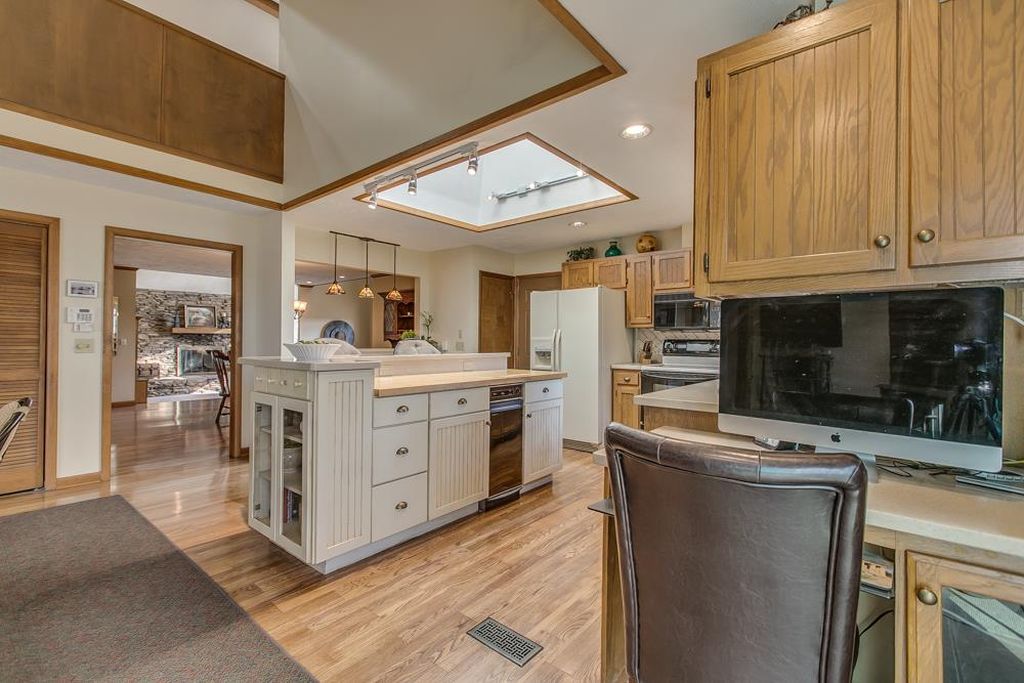


See, I told you!  Straight out of the 80s.  Vanilla cabinets, countertop, backsplash, and oak cabinets.  None of this was in bad shape.  It was just dated and not our style. 

So, our plan was to take down the upper cabinets to open up the kitchen space.  With the vaulted ceiling in the breakfast area and the 8' ceiling in the kitchen area, the upper cabinets made the space feel like everthing was crammed into the area. 
So, after we moved in, had two weddings, Thanksgiving, and Christmas...DEMO DAY began!


Nothing like swinging that heavy hammer to release stress lol!  We actually didn't destroy the cabinets that we removed.  They're solid wood and well made.  We sold a few and repurposed the others for storage in the garage.  I hate to watch home shows where they just destroy everything. 

Anyhoo, we removed this side desk area and the upper cabinets.  We were also able to remove the countertops in one piece and sold them too.  Every little bit of money back into the budget helps when renovating.

Ok, enough talk...let's get to the good stuff!  Ready to see the after photos! 

Here ya go!


We removed the uppers and replaced them with open shelving.  We replaced the old almond colored electric stove with a gas stove and added a new stove hood.  We also replaced the old almond colored refrigerator with a new stainless one.  The dishwasher was only a couple of years old so we kept it.  It was black and worked with the plans also.  And, did you notice the cabinets?  Same ones.  We just painted them black and added new champagne gold hardware.  (Sorry the lighting is bad in these photos...one day was so gloomy and dark and the next was super sunny.  Lots of natural light in this house and I love it!)


We replaced the cream colored Corian countertops with a white quartz.  It has a subtle grey veining but appears white overall.  The double sink was replaced with a graphite Blanco granite sink.  The faucet is champagne gold and black as are the sconces.  All from Amazon and you can find them HERE and HERE. (affiliate link)


And, the part that took SO long but was SO worth it...the solid quartz backsplash.  With the open shelves, I knew I'd have a lot of things displayed on them.  I was afraid by using a tile/grout backsplash, it would add too much busyness.  The smooth surface of the solid quartz balances the busyness on the shelves.  What can I say, I like stuff and I enjoy having my stuff out where I can see it :)


If you had asked me a couple of years ago if I'd have a black/white/blue kitchen, I would have said no way.  Now that I've got it...I love it.  The colors, lines of the shelving, solid countertops and backsplace fit nicely into the contemporary feel of this home.  However, my collection of blue and white dishes and antique copper pots fit the space as well.  All about balance!


This is the bar area looking into the dining room.  For an older home, it has a great open concept feel.  In this area, we removed the hanging pendent lights and replaced them with two small recessed lights.  The quartz countertops were brought into this area as well.  It makes the perfect area for my coffee and it's a great spot for serving food when entertaining. 

So, that's the kitchen reno.  What do you think?! 

If you missed the renovation progress we've done, you can click HERE to see the wet bar area renovation or click HERE to see the master bedroom sun deck.

Thanks for stopping by and, as always, God bless!

Angie

Sunday, September 24, 2017

Farmhouse Style to be Replaced with Chinoiserie??


I read recently that the farmhouse style we all love is to be replaced soon with chinoiserie.  What??!!

farmhouse chinoiserie spain hill farm fall decor

Actually, replaced may be the wrong term.  I'd like to change it to "married!"  

What if farmhouse style married with chinoiserie?  Sound crazy?

farmhouse chinoiserie spain hill farm fall decor


Total side note:  Maybe it's the fall weather.  I think this is a great time of year to get married.  My husband and I were married in October and it was the perfect fall day.

farmhouse chinoiserie spain hill farm fall decor

farmhouse chinoiserie spain hill farm fall decor


farmhouse chinoiserie spain hill farm fall decor


Actually, farmhouse and chinoiserie make a great couple.  I've been trying to "fix the two up" for years and hopefully others are warming up to the idea.


farmhouse chinoiserie spain hill farm fall decor

Did you notice the upholstery on my kitchen chairs? Or the bamboo frames on the farmhouse paintings above?  How about the non-white walls?

farmhouse chinoiserie spain hill farm fall decor

farmhouse chinoiserie spain hill farm fall decor

farmhouse chinoiserie spain hill farm fall decor

farmhouse chinoiserie spain hill farm fall decor

How about oriental porcelains in blue and white?  Or geometric patterns?

farmhouse chinoiserie spain hill farm fall decor cotton blooms

farmhouse chinoiserie spain hill farm fall decor pumpkins

What about cotton blooms and chinoiserie pumpkins?!  

So what do you think?  Farmhouse marries Chinoiserie.  Too crazy??

Thanks for stopping by!
Angie

farmhouse marries chinoiserie spain hill farm


Wednesday, August 19, 2015

Kitchen Gadgets That Make Cooking Effortless

Are you a whiz in the kitchen or a wizard with frozen meals?

Today I'm sharing some of my favorite kitchen gadgets that can help any level of cook.

My first and all time favorite is the KitchenAid mixer.  I know a lot of brides-to-be are adding these to their wedding registry and what a smart choice it is!

kitchen gadgets for effortless cooking


KitchenAid has been in the appliance business for many, many years.  It's no surprise either.  The KitchenAid mixer is a very versatile appliance.  It can be used for a number of things from mixing, kneading, grinding wheat to juicing oranges and slicing vegetables.  This is a workhorse in the kitchen.  Bed, Bath, and  Beyond is a retailer of KitchenAid products.

kitchen gadgets for effortless cooking


Along with preparing that dish in your KitchenAid, you're going to need some quality utensils.  My dad always taught me to buy the best you can afford.  Why?  Because using quality tools for any job makes the job much easier.  I highly recommend purchasing quality bamboo or wooden spoons and spatulas.  World Market carries a nice variety of wooden utensils.

kitchen gadgets that make cooking effortless


Along with quality utensils, you're going to need quality ingredients.  We use extra virgin olive oil in our home like crazy!  The quality of your ingredients will affect the overall taste of your dish.  The Epicurean Olive Oil Company carries just that...quality olive oils, vinegars, and seasonings.  I guarantee you'll taste a difference in your dishes!

kitchen gadgets that make cooking effortless


Finally, but not lastly, my final gadget for the kitchen.  Well, it isn't really a gadget but something I highly recommend and really wish (please oh please) would make a huge comeback...the apron!  I love aprons and I use aprons.  Vintage ones.  New ones.  Plain ones.  Pretty ones.  One of my current favorites came from Kirklands and has my initial on it.  It doesn't directly make cooking effortless but it definitely makes clean up effortless!

I'm so glad you stopped by!  God bless!

Angie

Saturday, March 7, 2015

Pasta, Pesto, and Peas - The Perfect Dish for Spring

pasta-pesto-and-peas-spring-recipe

Several months ago when I helped with the Denim and Diamonds Charity Auction, the caterers served this delicious dish of pasta, pesto, and peas.  My daughter and I loved it so we came home and created our own version.

Basically, it's just five ingredients:  farfelle (bowtie) pasta, pesto, mayo, frozen peas, and parmesan cheese for a topping.  The taste, however, is anything but basic.  It's like a taste of spring in each bite.  Very fresh and light.

pasta-pesto-and-peas-recipe

Simply prepare the pasta according to the directions on the box and drain.  Gently stir in the frozen peas, that have been thawed.

pasta-pesto-and-peas-recipe
 
Allow the peas and pasta to cool while you mix together the mayo and pesto.  Combine the two well, adding salt and pepper to taste.

pasta-pesto-and-peas-recipe

Gently stir the pesto/mayo into the peas and pasta.  Wow, this is becoming a tongue twister!

You're now ready to enjoy or refrigerate it for later!

pasta-pesto-and-peas-recipe

pasta-pesto-and-peas-recipe

And, just because it's almost St. Patrick's Day, and this pasta, pesto, and peas dish would be perfect for St. Patrick's Day (just to add more p's to the story), I garnished this dish with a sprig of parsley!

pasta-pesto-and-peas-recipe

Here's a copy of the recipe to print...(gah! another p word!)

pasta-pesto-and-peas-recipe

Thanks for stopping by and God bless!!

Pangie...I mean Angie!

I'm linking here:

RAIN ON A TIN ROOF
THE STYLE SISTERS
JENNIFER RIZZO
HOME STORIES A TO Z
FROM MY FRONT PORCH TO YOURS
HAVE A DAILY CUP OF MRS. OLSON
COASTAL CHARM'S NIFTY THRIFTY TUESDAY
STONEGABLE
UNDER THE TABLE AND DREAMING

Sunday, February 22, 2015

2-in-1 Easy DIY Farm Animal Cutting Boards


easy 2-in-1 farm animal cutting board

At our house, we are forever asking, "Where's the cutting board?"  I guess it's because we home school, which means we eat all three meals at home most days, which means we are always preparing food, which means the cutting board is constantly being used.  Know what I mean??

We definitely needed more cutting boards.  Not just more, but smaller ones for those small jobs like cutting lemons for tea or slicing veggies for a sandwich.  That's when I decided to just make some.

Here's what you'll need if you want to make your own:

a piece of 1" pine shelving
pencil for drawing or transferring your design on the wood
120 grit sandpaper
coconut oil (or food-grade mineral oil)
scroll saw or jig saw
drill and drill bit (if making interior cuts)
safety glasses

easy 2-in-1 farm animal cutting board


1.  Choose your design and draw or transfer it onto the board.  I knew I wanted to make a farm animal design and the traditional chicken on the back of a pig on the back of a cow seemed perfect.  I cut a puzzle shape between the cow and pig so that the board could be used as a whole or as two separate boards.

easy 2-in-1 farm animal cutting board


2.  Wearing your safety glasses, begin cutting your design out of the board.  Be slow and careful as you cut any curved shapes.  A scroll saw is great for making these cuts...just take your time and don't rush the cutting process.

easy 2-in-1 farm animal cutting board


3.  When I made the interior cuts between the pig and cow, I first drilled a hole.  This gives you room to turn the blade (if using the scroll saw) or it gives you a place to begin (if using a jig saw).

4.  After all the cuts have been made, sand the edges and any remaining pencil marks with the sandpaper.

easy diy farm animal cutting boards


5.  Now you're ready to seal your board.  I used coconut oil because it's natural and will not turn rancid like vegetable oil.  You do not want to use a protein or vegetable based oil!  Begin by rubbing in the coconut oil with a clean cloth.  Cover the entire board in an even coat.  Let it sit for 12-24 hours in a warm place.  Apply more to any areas that may need more and allow to sit again.  Repeating until no more oil is absorbed.  Wipe any remaining oil with a dry cloth and buff until it shines!  You can repeat after a few months to keep your board conditioned.

They're ready to use!!

easy 2-in-1 farm animal cutting board

easy 2-in-1 farm animal cutting board

Pretty easy!  ;)

easy diy farm animal cutting boards


Thanks for stopping by and God bless!!
Angie


I'M LINKING HERE:

RAIN ON A TIN ROOF THE STYLE SISTERS
JENNIFER RIZZO
HOME STORIES A TO Z
FROM MY FRONT PORCH TO YOURS
HAVE A DAILY CUP OF MRS. OLSON
COASTAL CHARM'S NIFTY THRIFTY TUESDAY
STONEGABLE
UNDER THE TABLE AND DREAMING

Wednesday, February 18, 2015

Quick & Easy - How to Repackage Bulk Ground Beef WITHOUT Getting Your Hands Dirty!

how to repackage bulk ground beef without getting your hands dirty

Today I'm sharing a super easy tip for dividing and repackaging bulk ground beef.  You know, those huge, bulk ground beef packages that we all get at the grocery store because the price of ground beef is cheaper by the pound that way, but then you get home and you're tired from shopping but that 5 pounds of bulk ground beef is staring at you and you're tempted to just throw it in the freezer as is!  Yeah, I've done it.  And regretted it.  That's when I came up with this oh-so-easy method of dividing the beef and putting it in freezer bags, all without even getting your hands dirty!

quick and easy tip for how to repackage bulk beef to freeze

Start with your bulk package.  Save the plastic bag that you put it in from the store.

quick and easy tip for repackaging bulk beef for freezing

Using freezer bags, turn down the tops of each so that they stay open.  

quick and easy tip for repackaging bulk beef for freezing

Using a serrated knife, cut the beef into portions.  This is a 3 lb. package so I cut it into thirds.

quick and easy tip for repackaging bulk beef for freezing

Now, grab one of the portions.  The ends are easiest.   

quick and easy tip for repackaging bulk beef for freezing

quick and easy tip for repackaging bulk beef for freezing

Placing it in the bag, I begin twisting the end.  The beef will slide out nice and clean that way.

quick and easy tip for repackaging bulk ground beef


quick and easy tip for repackaging bulk ground beef

Here's the middle portion.  I pick it up by the plastic that's still around it.  Use the serrated knife to slice open the plastic, leaving the beef free to fall into the bag.

quick and easy tip for repackaging bulk ground beef

Now, the three pounds of beef are in bags and ready to freeze.  I try to remove as much air as possible.  I also pat mine flat so that they'll stack in the freezer AND take less time thawing.


Don't forget that meat department bag I told you to save.  I toss the packaging into it and throw it all away.  Now, you've just got a serrated knife to wash and you're done.  I can usually do this in just a matter of minutes and minimal mess.  No more dreading having to divide the bulk beef or regretting that I threw it in the freezer whole!

I hope this tip saves you some time in the kitchen!

Thanks so much and God bless!!
Angie


Here's a pic to pin!  
quick and easy tip for repackaging bulk ground beef


I'm linking here:

THE STYLE SISTERS
JENNIFER RIZZO
HOME STORIES A TO Z
FROM MY FRONT PORCH TO YOURS
HAVE A DAILY CUP OF MRS. OLSON
COASTAL CHARM'S NIFTY THRIFTY TUESDAY
STONEGABLE
UNDER THE TABLE AND DREAMING