Subscribe to our Newsletter!

Sunday, January 5, 2020

Kitchen Renovation of our 1980s Contemporary Home - Must See Before and After!

Wow!  It's been a while!  We've been busy with renovations of the 1980s contemporary home we purchased in Fall of 2018.

We finally finished the kitchen renovation!  It was a long process, mainly because of the backsplash I chose.  I've learned when selecting materials for your renovation, always check availability.  The backsplash we ordered took FOUR months to have cut, shipped, and installed.

I can't wait to show you after photos of the kitchen but, first, let's go back to what we started with.  Here are the befores (straight from the MLS with the previous owner's decor :)
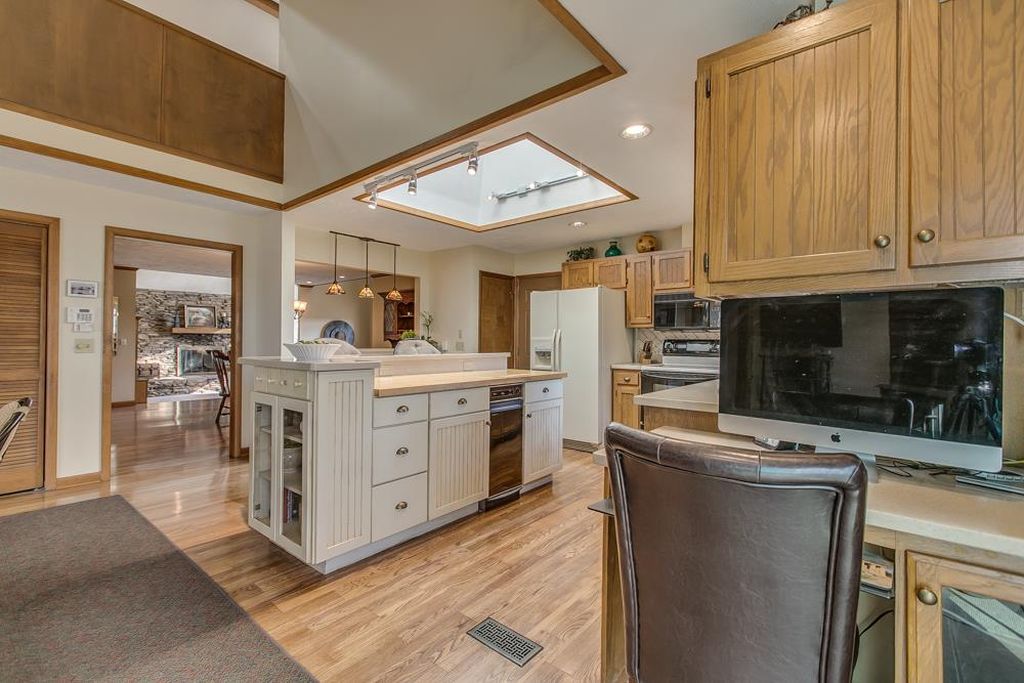


See, I told you!  Straight out of the 80s.  Vanilla cabinets, countertop, backsplash, and oak cabinets.  None of this was in bad shape.  It was just dated and not our style. 

So, our plan was to take down the upper cabinets to open up the kitchen space.  With the vaulted ceiling in the breakfast area and the 8' ceiling in the kitchen area, the upper cabinets made the space feel like everthing was crammed into the area. 
So, after we moved in, had two weddings, Thanksgiving, and Christmas...DEMO DAY began!


Nothing like swinging that heavy hammer to release stress lol!  We actually didn't destroy the cabinets that we removed.  They're solid wood and well made.  We sold a few and repurposed the others for storage in the garage.  I hate to watch home shows where they just destroy everything. 

Anyhoo, we removed this side desk area and the upper cabinets.  We were also able to remove the countertops in one piece and sold them too.  Every little bit of money back into the budget helps when renovating.

Ok, enough talk...let's get to the good stuff!  Ready to see the after photos! 

Here ya go!


We removed the uppers and replaced them with open shelving.  We replaced the old almond colored electric stove with a gas stove and added a new stove hood.  We also replaced the old almond colored refrigerator with a new stainless one.  The dishwasher was only a couple of years old so we kept it.  It was black and worked with the plans also.  And, did you notice the cabinets?  Same ones.  We just painted them black and added new champagne gold hardware.  (Sorry the lighting is bad in these photos...one day was so gloomy and dark and the next was super sunny.  Lots of natural light in this house and I love it!)


We replaced the cream colored Corian countertops with a white quartz.  It has a subtle grey veining but appears white overall.  The double sink was replaced with a graphite Blanco granite sink.  The faucet is champagne gold and black as are the sconces.  All from Amazon and you can find them HERE and HERE. (affiliate link)


And, the part that took SO long but was SO worth it...the solid quartz backsplash.  With the open shelves, I knew I'd have a lot of things displayed on them.  I was afraid by using a tile/grout backsplash, it would add too much busyness.  The smooth surface of the solid quartz balances the busyness on the shelves.  What can I say, I like stuff and I enjoy having my stuff out where I can see it :)


If you had asked me a couple of years ago if I'd have a black/white/blue kitchen, I would have said no way.  Now that I've got it...I love it.  The colors, lines of the shelving, solid countertops and backsplace fit nicely into the contemporary feel of this home.  However, my collection of blue and white dishes and antique copper pots fit the space as well.  All about balance!


This is the bar area looking into the dining room.  For an older home, it has a great open concept feel.  In this area, we removed the hanging pendent lights and replaced them with two small recessed lights.  The quartz countertops were brought into this area as well.  It makes the perfect area for my coffee and it's a great spot for serving food when entertaining. 

So, that's the kitchen reno.  What do you think?! 

If you missed the renovation progress we've done, you can click HERE to see the wet bar area renovation or click HERE to see the master bedroom sun deck.

Thanks for stopping by and, as always, God bless!

Angie

Tuesday, February 5, 2019

Master Bedroom Sun Porch Makeover - Bohemian Style


sunroom sun porch 80s contemporary house spain hill farm

Remember this sun porch from our "new" house tour?  It's a small room off the master bedroom and the view makes one feel like you're in a tree house.


I knew the moment I stepped through the doors when viewing this house that this was going to be MY space.  My own little retreat to do my devotions, read books, take naps, hide from everyone.  Oops, did I say that out loud? :D

The first thing I had done was to hire a local window washing company to wash ALL the windows and skylights (there are 7..SEVEN in this house!)  It was actually more reasonable that I was expecting but I will say it may only be a once every year or two splurge.  


The carpet is fairly new so I didn't have to replace the flooring in this area.  So I began with selecting a few furniture pieces...mainly, this amazing daybed from World Market and the blue rattan chair and ottoman from Wayfair.

World Market rattan daybed sun porch makeover spain hill farm

Isn't it cool!?!  With the cedar siding exterior in this space, I felt a boho feel fit best with the wood.  And, my two favorite colors, blue and orange go right along with the boho look.

walmart blue velvet bolster pillows spain hill farm

I found these beautiful blue velvet bolster pillows at Walmart.  They were about $16 each and look like ones that cost much more.  The other pillows I snagged from around the house.


After the furniture and bedding were done, I just had to finish it off with the wall decor.  One inexpensive way to fill a large space is to do a gallery wall.  The wall behind the daybed is a filled with straw hats I purchased at thrift store.  They make a big impact for about $20 total.


The side tables were purchased at a yard sale years ago and the rugs are from a local discount store that sells overstock merchandise from Target and Amazon.  Lots of great deals but you have to visit often before they're sold out. 

So that's a wrap.  Now, I'm off to grab a mug of coffee and my favorite book.  You know where to find me if you need me!

Blessings!
Angie

Pin it so you don't forget it!

sun porch sunroom makeover 80s contemporary cedar siding home spain hill farm


Wednesday, January 30, 2019

Wet Bar Area Before and After of Our 80s Contemporary Home

I'm so glad you are here.  I still can't believe we bought a 1980s fixer upper but I've been so excited to get my hands on it and begin the renovations.  

With so much else going on, I knew we couldn't start with anything big like the kitchen so we began with the wet bar first.  

Here's a before..ignore all the dishes.  I like to cause myself a lot of work by packing and unpacking and packing and unpacking again.  


before after pic 1980s contemporary wet bar renovations

Friday, January 25, 2019

Hey, remember me?! Spain Hill Farm is back to blogging!


Hope y’all have been doing well! It’s been awhile since I last posted, let me share a little about
what’s happened in the past year; 2018 was quite the year, filled with all the ups and downs
that life throws at you. We were confronted with unexpected death and illnesses, but we were
also blessed with two weddings (my oldest and middle daughters got married about 10 weeks
apart!)  and a new (to us) home!

Becoming empty nesters last year got us thinking that it was about time to downsize, and when
we had a family knock on our door interested in buying our house, we decidedto dive right into
house hunting once again. We really loved the area we were currently living in, so we focused
our search in the surrounding neighborhoods, primarily in an older, established neighborhood
beautifully perched up in some hills with tons of huge trees! Low and behold, an 80’s
contemporary wood-sided home came on the market. My family immediately fell in love with
what they called the “Brady Bunch” house, they loved the multi-level layout that was perfect for
Nerf gun wars; I, on the other hand, needed a little convincing. After a lot of prayer and thought,
we decided to put an offer on the Brady Bunch house, and at the beginning of August (just a
couple of weeks before one of our daughter’s weddings) we moved in!


Now when I say 80’s contemporary, I mean 80’s contemporary! Ready to see pics?!

1980s contemporary cedar siding home 80s

Exterior with cedar siding and lots of trees and ivy

Monday, January 7, 2019

Easy DIY Valentine Craft - Carved in Stone


I did a post on carved rocks several years ago and it was such a hit!  Valentine's Day is approaching and now is a great time to share this DIY project.   It was super easy and I love the results.

I'm a rock hound so I had plenty of river rocks around the house, but if you don't, try simple landscaping rocks from the home building store.  I'd bet you could even find a great one while on a walk :)   A Dremel tool can be purchased online or at big box stores.  They start at less than $20 and are a great tool to have around.

Easy Valentine Craft, carved stone, the altered past blog


Here's the other items you'll need:

rock(s)
Dremel 7700-1/15 MultiPro 7.2-Volt Cordless Rotary Tool Kit
drill bit (usually included if you have the drill kit)
marker or chalk
safety glasses (there will be dust and possibly fragments)

Easy Valentine Craft, carved stone, the altered past blog

Ready?  Let's get started.  Choose the sentiment you want forever carved in stone.  Write it on the stone with the marker or chalk to get the placement and size right.  I chose a silver Sharpie so that it would blend with the color of the rock.  You want to use something that won't be seen afterwards.

easy valentine craft diy project dremel drill carved stone

Once you like the placement and size of your sentiment, begin carving using the Dremel tool.  Go slowly and try not to carve too deeply at first.  You can go back over the lines again and again to make them deeper.  Important:  make sure to hold the drill firmly as it may want to jump a little, making crooked lines, ruining your design.  If that happens, just toss the rock out in the backyard and hundreds of years from now an archaeologist will find it and will be so confused!  Lol!  I so want to carve something crazy and throw it outback just for the fun of it!  Ok, I digress.

Easy Valentine Craft, carved stone, the altered past blog

Don't worry, even going slowly, this craft only took me a few minutes to complete.   Take a look at the ones I created...all in less than 30 minutes!

Easy Valentine Craft, carved stone, the altered past blog

carved stone dremel drill diy valentine's day project rocks


I'm pretty excited with how well these turned out.  I think they would make a great gift for anyone but especially for that special guy in your life...a Valentine that's not too frilly or heartsy or red!

Thanks for stopping by and God bless!
Angie


The above is an affiliate link to Amazon.  The little amount I earn helps bring you more from Spain Hill Farm and Angie Forte Design.  Thanks!

Sunday, September 24, 2017

Farmhouse Style to be Replaced with Chinoiserie??


I read recently that the farmhouse style we all love is to be replaced soon with chinoiserie.  What??!!

farmhouse chinoiserie spain hill farm fall decor

Actually, replaced may be the wrong term.  I'd like to change it to "married!"  

What if farmhouse style married with chinoiserie?  Sound crazy?

farmhouse chinoiserie spain hill farm fall decor


Total side note:  Maybe it's the fall weather.  I think this is a great time of year to get married.  My husband and I were married in October and it was the perfect fall day.

farmhouse chinoiserie spain hill farm fall decor

farmhouse chinoiserie spain hill farm fall decor


farmhouse chinoiserie spain hill farm fall decor


Actually, farmhouse and chinoiserie make a great couple.  I've been trying to "fix the two up" for years and hopefully others are warming up to the idea.


farmhouse chinoiserie spain hill farm fall decor

Did you notice the upholstery on my kitchen chairs? Or the bamboo frames on the farmhouse paintings above?  How about the non-white walls?

farmhouse chinoiserie spain hill farm fall decor

farmhouse chinoiserie spain hill farm fall decor

farmhouse chinoiserie spain hill farm fall decor

farmhouse chinoiserie spain hill farm fall decor

How about oriental porcelains in blue and white?  Or geometric patterns?

farmhouse chinoiserie spain hill farm fall decor cotton blooms

farmhouse chinoiserie spain hill farm fall decor pumpkins

What about cotton blooms and chinoiserie pumpkins?!  

So what do you think?  Farmhouse marries Chinoiserie.  Too crazy??

Thanks for stopping by!
Angie

farmhouse marries chinoiserie spain hill farm


Sunday, September 10, 2017

Meeting John Gidding of HGTV's Curb Appeal: The Block

This post contains affiliate links.  Thanks!


Photo from Nashville Home Show.com


This past Friday, I attended the Nashville Home Show and met HGTV's John Gidding.  We actually had a special blogger/media event with John.


Did you know he graduated from Harvard with an architecture degree? Wow! He had lots to share about adding curb appeal to our homes.


The biggest takeaway from his talk was that he always looks at these five things when approaching a home's curb appeal:

1.  The Front Path - Is that path easily accessible from the driveway or street?  If not, make changes so that your guest have an obvious, welcoming path to your front door.

Consider adding pavers like these!  A few of these stone looking pavers are inexpensive yet create an obvious path to the front door where no sidewalk exists.


2.  The Front Door - Can the front door use a fresh coat of paint or even a color change?  Some colors are traditional to certain styles of houses so the color choice may be fine.  See if it needs freshening up.  If you want to change the color, choose a color that fits with the style but also adds a pop of color to the front facade.  I have used and recommend Modern Master's Front Door paint.  I painted the front door of our former home with their Elegent (Navy Blue).  Loved it!


3.  The Mailbox - Is your mailbox sad, beat-up, or just plain boring?  Add a little pizzazz.  Here you can get a little expressive!  Love this bronze one from Amazon. Even just adding your house numbers in an exciting, eye-catching color helps.  Which brings me to the fourth item.


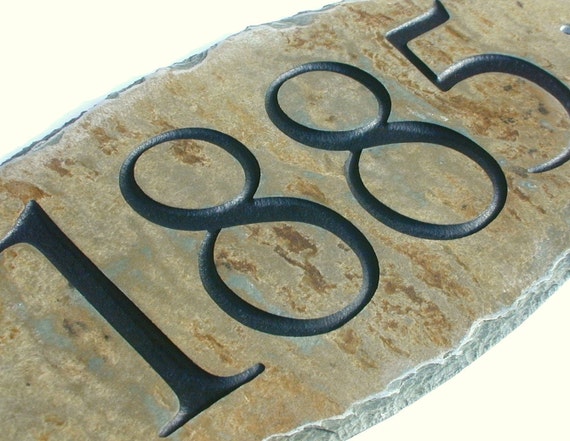
4.  The House Numbers - Here is another area you can express yourself.  John said adding nice looking numbers to the front of your home gives your guests an idea about you.  Do you have the sad reflective stick on numbers?  I confess, my mailbox is the only place we have our house number and, YES, they are those 96 cents reflective stick ons.  I've added it to my list to change ASAP.  Many online sites have inexpensive numbers in a variety of styles.  Why not choose a fun one?!  I'm considering something like this from Etsy.


5.  The Not So Perfect Items - Are there things that need fixing up?  Is there an item that's broken or just doesn't belong?  Those are the last items John considers when adding curb appeal to a home.  

See, it doesn't take a lot of money to make your home more appealing.  These are great tips if you're considering selling your home.  If you are, just make sure your choice of door color as well as the mailbox adornment would be pleasing to most everyone.  

Hope you learned something.  I sure did!  John was very nice and generous to share his tips with us.

Thanks for stopping by!
Angie