Subscribe to our Newsletter!

Showing posts with label paint. Show all posts

Sunday, September 10, 2017

Meeting John Gidding of HGTV's Curb Appeal: The Block

This post contains affiliate links.  Thanks!


Photo from Nashville Home Show.com


This past Friday, I attended the Nashville Home Show and met HGTV's John Gidding.  We actually had a special blogger/media event with John.


Did you know he graduated from Harvard with an architecture degree? Wow! He had lots to share about adding curb appeal to our homes.


The biggest takeaway from his talk was that he always looks at these five things when approaching a home's curb appeal:

1.  The Front Path - Is that path easily accessible from the driveway or street?  If not, make changes so that your guest have an obvious, welcoming path to your front door.

Consider adding pavers like these!  A few of these stone looking pavers are inexpensive yet create an obvious path to the front door where no sidewalk exists.


2.  The Front Door - Can the front door use a fresh coat of paint or even a color change?  Some colors are traditional to certain styles of houses so the color choice may be fine.  See if it needs freshening up.  If you want to change the color, choose a color that fits with the style but also adds a pop of color to the front facade.  I have used and recommend Modern Master's Front Door paint.  I painted the front door of our former home with their Elegent (Navy Blue).  Loved it!


3.  The Mailbox - Is your mailbox sad, beat-up, or just plain boring?  Add a little pizzazz.  Here you can get a little expressive!  Love this bronze one from Amazon. Even just adding your house numbers in an exciting, eye-catching color helps.  Which brings me to the fourth item.


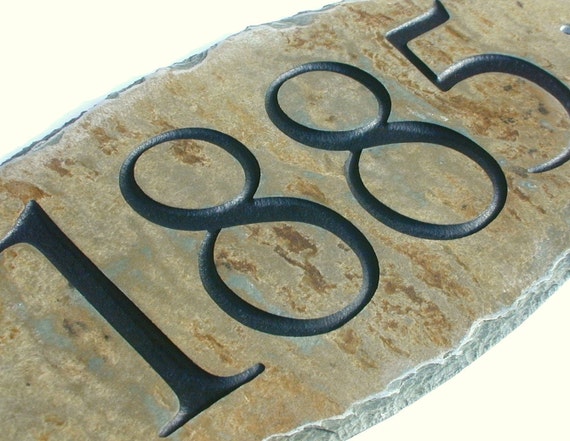
4.  The House Numbers - Here is another area you can express yourself.  John said adding nice looking numbers to the front of your home gives your guests an idea about you.  Do you have the sad reflective stick on numbers?  I confess, my mailbox is the only place we have our house number and, YES, they are those 96 cents reflective stick ons.  I've added it to my list to change ASAP.  Many online sites have inexpensive numbers in a variety of styles.  Why not choose a fun one?!  I'm considering something like this from Etsy.


5.  The Not So Perfect Items - Are there things that need fixing up?  Is there an item that's broken or just doesn't belong?  Those are the last items John considers when adding curb appeal to a home.  

See, it doesn't take a lot of money to make your home more appealing.  These are great tips if you're considering selling your home.  If you are, just make sure your choice of door color as well as the mailbox adornment would be pleasing to most everyone.  

Hope you learned something.  I sure did!  John was very nice and generous to share his tips with us.

Thanks for stopping by!
Angie


Monday, January 19, 2015

Easy Way to Paint a Table and Chairs

quickly and easily paint table and chairs with paint sprayer, the altered past blog

Are you constantly upgrading your stuff like I do?  I mean, I had a perfectly decent table in my office.

quickly and easily paint table and chairs with paint sprayer, the altered past blog

I bought this table at the thrift store a few years ago.  It's worked fine as a craft table and desk but it took up more room than I liked.  I also knew at some point I would paint it.  It has a beaded edge and beautiful legs.

Fast forward to just a few weeks ago when I saw an ad for a table with 6 chairs.  I didn't need the chairs but the table was exactly what I'd been looking for and the price was right.  Hubby and I made a trip across town and the set was mine.

Time to bring my current table downstairs to finally paint it along with the 6 chairs that came with the new table.

I hate painting.  Having I ever mentioned that?  I really do.  Probably because I stink at it.  Ask me to paint you a landscape or a still life and I'm your gal.  Ask me to paint a wall or a piece of furniture and I'll make a mess of it.  I know, it's like opposite world because I'm just weird like that.


quickly and easily paint table and chairs with paint sprayer, the altered past blog

This was the beginning of the torture painting.  I used a linen white chalk paint because I love the coverage you get with chalk paint.  What I don't like is having to get into all those little grooves.  That's when I decided to reach out to the people of HomeRight and give their Finish Max Pro paint sprayer a try.

They happily agreed and this beauty arrived!

quickly and easily paint a table and chairs with paint sprayer, the altered past blog

My knight in shining blue plastic :)

If you've never used a paint sprayer before, here's some quick tips:  make sure you have lots of space in a well-ventilated area, put tarps or plastic down to catch over spray, face mask, if you're inside, and latex gloves, if you have manicured nails (unlike me).

quickly and easily paint a table and chairs with paint sprayer, the altered past blog

First coat of paint done with a brush (and possibly a few choice words)

quickly and easily paint a table and chairs with paint sprayer, the altered past blog

Nice, smooth coat of paint MINUTES later using HomeRight Finish Max Pro paint sprayer.  

I will confess here.  I tried out the sprayer in the garage on this chair.  Along with the over spray, you need to expect a lot of dust, I guess you could call it, from the dried paint particles flying in the air.  I did have to sweep up the dust from the garage floor so I moved my operation outside on the next day when it was sunny.  

quickly and easily paint a table and chairs with paint sprayer, the altered past blog

Even with the time it takes to set up my spraying area and the clean up of the paint sprayer (which is pretty darn easy), using this method to paint the 6 chairs took probably less than half of the time it would have taken me with a brush.  And, the finish is nice and smooth, free from brush marks.

quickly and easily paint a table and chairs with paint sprayer, the altered past blog


quickly and easily paint a table and chairs with paint sprayer, the altered past blog

quickly and easily paint a table and chairs with paint sprayer, the altered past blog

Not sure why the top looks like it has grayish areas but it's totally white.

Seriously guys, a paint sprayer is the bomb!  I was able to finish two large painting projects in just a couple of days.  Just make sure you take it outside if you don't have ample space and ventilation inside.  You don't want to save all that time only to have to clean up the garage ;)

Many thanks to the people of HomeRight for sending me the Finish Max Pro.  The projects and opinions about their product are 100% mine.

Oh, and here's a little sneak peek at the new table in my office!


Thanks for stopping by and God bless!
Angie

I'm linking here:
THE STYLE SISTERS
JENNIFER RIZZO
HOME STORIES A TO Z
FROM MY FRONT PORCH TO YOURS
HAVE A DAILY CUP OF MRS. OLSON
COASTAL CHARM'S NIFTY THRIFTY TUESDAY
STONEGABLE
UNDER THE TABLE AND DREAMING

Wednesday, November 12, 2014

Vintage Truck Doors Logo


Have you ever been to Roosterpoot, Tennessee?  No?  Me neither.  Probably because it doesn't exist except to my brother maybe.

Well kidding aside, it isn't a real place but my brother is and he owns a real 1950s model Ford truck.  He owns a few vintage trucks and he has one in particular that he wanted me to paint a logo on the doors.  No stress there!!  It's just the doors of your vintage truck!

It seems the "thing" to do in the old hot rod truck world right now is to create a vintage looking logo on the doors...even distressing and aging the logo.  Well, that's right up my alley so I agreed to do it.

I won't go into lengthy details on how I did it because, really, who's ever gonna need this info.  BUT, I thought you'd enjoy seeing a snapshot of the process and the finished doors.  I think the design process took the longest.  I used Photoshop and arranged the lettering and rooster design.  After I printed it, I enlarged it so that I could make a stencil for the doors.  Here's the first layer (candy apple red) on the door.


Ok, that was the hardest part!  Putting that first layer of paint on the door.  It was somewhat forgiving in that the doors were painted in a flat black so any goof ups could be sanded and repainted with flat black.  Thankfully, I didn't have to do that.


Next step was to begin adding the white detail to the lettering and image.  So far, so good.


More detailing by adding the yellow and black paint.  Looking pretty good!


Got everything painted!  The next step my husband almost couldn't stand to watch.  I took sandpaper to the whole thing and began distressing it...heavily.


I r-e-a-l-l-y liked the finished distressed look.  I think it gave the rooster even more attitude ;)

It took me a few weeks from start to finish.  I called my brother to let him know they were finished but that I wouldn't send him a photo as I wanted him to be surprised when he saw them for the first time.  Well, that didn't last long.  He lives about 3 hours away so the soonest he could come was about a week out.  I broke down and posted a photo on Facebook for him to see.  He loved them.  

And, after he got them back home, I asked for a photo with them on the truck!  (I knew it would be great!) 

Here's what I got:


Oh well, I was very thankful for the photo I did get.  I'll try to grab another one when I'm home at Christmas.  If I lived closer to him, you better believe I'd be using his trucks for some killer photo shoots!

Thanks for stopping by and God bless!
Angie

I'm linking here:
THE STYLE SISTERS
JENNIFER RIZZO
HOME STORIES A TO Z
FROM MY FRONT PORCH TO YOURS
HAVE A DAILY CUP OF MRS. OLSON
COASTAL CHARM'S NIFTY THRIFTY TUESDAY
STONEGABLE
UNDER THE TABLE AND DREAMING

Sunday, July 20, 2014

Beautiful Home Tour in Franklin Tennessee

This past week I was honored to be invited to a small get together for #NashvilleInfluencers, Nashville area bloggers, designers, columnists, television hosts, and media specialists.  It was hosted by Dana Tucker and Nancy McNulty of Forest Home Media and was held at Dana's beautiful home in Franklin.


After we all got to meet each other, chat, and refresh ourselves with some delicious Southern Breeze punch (recipe at the end of the post), margaritas, wine, and tasty appetizers, Dana treated us all to a tour of her home.  And, I get to share it with you!

We started in the foyer.  Notice the ceiling.  Rather than remove the original popcorn ceiling, they chose to cover it with these beautiful tiles.  Love the look!


Dana and her husband are the creative genius behind Bella-Tucker Decorative Finishes (you'll notice all of the beautiful painting techniques in the following pictures.)  They painted the hallway with large gray and white stripes.  The scale works perfect here.


Check out the family room!  They changed the color of the brick with paint and added a piece of rusted metal roofing above.  


Adjacent to the family room is a sitting area.  They stenciled this beautiful pattern on one wall.  Like the stripes in the foyer and hallway, the scale of this pattern works perfectly on this large wall.


This bedroom belongs to Dana's daughter.  I didn't capture how great this room really looked.  
Another beautiful wall!


Their son's room with plank wall and distressed closet doors...perfect for a boy!


The sitting area in the kitchen.  Did you notice the shimmer on the wall?  It's silver and it's gorgeous.


This is in her kitchen leading to the deck.  Who knew you could put a screen door on French doors?  Ok, Dana knew and she did it.  I'm making a mental note for any French doors in my future.


Dana's whole house is incredible but I think this is my favorite room.  It's her home office...lots of natural light, great vintage pieces, and a beautiful chandelier...l-o-v-e it!


Although there were many more, I've got one last room to share.  This one is downstairs and has a silver wall like the kitchen.  And, look at the floor.  Know what that is?


It's a stencil on painted concrete.  Really, it is!  
It looks so good, it's hard to believe that's a concrete floor.

Dana's house is even better looking in person.  I hope you enjoyed the tour. Here's the Southern Breeze punch recipe I promised.  It came from Carmen Johnston, the garden lifestyle expert with Southern Living Plant Collection, who attended the party as well.

Southern Breeze

1 cup sugar
7 cups water
1 (0.22 ounce) envelope unsweetened blue raspberry lemonade mix
1 (6-ounce) can frozen lemonade concentrate, thawed
1 (46 ounce) can unsweetened pineapple juice, chilled
1 (2-liter) bottle ginger ale, chilled

Stir together first 4 ingredients in a 2-quart pitcher; pour evenly into 5 ice cube trays, and freeze at least 8 hours.  Combine pineapple juice and ginger ale, serve over raspberry ice cubes

Note:  The raspberry ice cubes can be made in advance and stored in heavy-duty zip-top plastic bags in the freezer until ready to serve.


Thanks for stopping by and God bless!
Angie

I'm linking here:
THE STYLE SISTERS
JENNIFER RIZZO
FROM MY FRONT PORCH TO YOURS
HAVE A DAILY CUP OF MRS. OLSON
COASTAL CHARM'S NIFTY THRIFTY TUESDAY
STONEGABLE
UNDER THE TABLE AND DREAMING

Monday, June 2, 2014

Compass Table


I have been wanting to make a compass table for a while.  So, when I came across an oak table at a yard sale for $30, I snatched it up.


Pretty decent shape...the table, not my garage!  I did very little to the table besides a good wipe down with a damp cloth.  

I pinned several compass tables (see them here) to get an idea of the design I wanted.  This is going in my oldest daughter's apartment so I knew the color scheme needed to be gray, white, blue, and yellow.  Because of the table's construction, it was pretty much divided into segments for me.  Drawing out the compass is fairly simple if you think about it like cutting a pizza or a cake.  Divide in half, quarters, and then eighths.  


When it comes to DIY projects, I'm somewhat impatient and usually break all of the rules.  I'm an instant gratification kinda gal.  Like to git 'er done, now! 

 I had an old bottle of milk paint in cornflower blue.  I used that for the outer circle.  The inner circle was lightly spray painted with Krylon Bright White.  I say lightly because the can was almost empty and I needed to make sure I got the entire tabletop covered...somewhat.  Then, the compass star was painted using plain ol' craft paint in white (uh, almost empty bottle) and gray.  I think my rule breaking stems from living 30 minutes from the nearest Wally World or craft store.  When I get the hankering to do something, I don't want to take an hour+ running into town gathering the proper supplies.  


This step is after I sanded the top and began applying a coat of stain with polyurethane.  I had a can of Minwax Special Walnut on hand so I used that.  I loved what it did to the blue but it muddied the white.  And, I kid you not, the can of Minwax was...wait for it...almost empty.  

So, this is where I left it at the end of day one.  Guess where I headed first thing the next morning?  Yep, Wally World.


So, whadda ya think?  I think it was worth that trip in to town.  I finished by spray painting the pedestal and legs with Rustoleum's Ultra Cover 2x...love the coverage you get with that stuff.  I did go back over the muddied white on the top and then gave the whole thing a good distressing with sandpaper.


My daughter is excited about it too.  Now to find 4 chairs to go with it before the move-in date in July.

Thanks for stopping by and God bless!
Angie

I'm linking here:
THE STYLE SISTERS


STONEGABLE

UNDER THE TABLE AND DREAMING