Subscribe to our Newsletter!

Thursday, September 4, 2014

DIY Pottery Barn Knockoff Grouted Pumpkins

mercury glass, pumpkins

Have you seen Pottery Barn's fall catalog?  They have some gorgeous grouted, mercury glass pumpkins.  The pumpkins are blown mercury glass with ribbed sides and grouted with concrete.  I loved the look of the mercury glass pumpkins but I wasn't sure about the grouted part.


So off I went to the thrift store to find a glass pumpkin.  I was actually looking for a lidded pumpkin jar but when I saw the glass light fixture globes, I thought they would be perfect.  (I didn't take a before pic so pretend with me that the above pic hasn't been finished, ok?)


To give the globe the mercury glass look, I used #Krylon's Looking Glass spray paint.  I love this stuff!  The process is super simple and there are tons of how-to's on it.  Basically, you spray a glass item from the back side of the glass and the mirror finish will show on the front.


For the mercury glass effect, spritz the glass with a little water before spraying.  Give a quick spray.  Allow to dry a minute then pat the water dry with a paper towel.  It really does look like the old mercury glass.


Now, it was time for the grouting.  I had unsanded grout on hand but I wasn't too sure I wanted to commit to covering up that beautiful mercury glass look.  So, I took the safe route.  I painted the entire globe with a white chalk paint and wiped off the ribbed areas, leaving the paint in the grooves.  I was pleased with the final look but I still prefer the mercury glass over this one, that's why I decided not to paint the other globe.

Now what to do for a stem.  I looked around my work room and thought about using small glass knobs.  Hmm...didn't quite look like a pumpkin.  I needed something that was kind of clear but malleable.

Oh wait!  Glue stick!  It was right in front of me.

I already had the glue gun out preparing to attach the leaves when it dawned on me that I could cut a glue stick in half and use it for the stem.  Ok, so cutting it in half didn't quite resemble a real stem so I used the hot glue gun (without a glue stick in it) and began melting the stick.  If you look at a pumpkin stem, it has grooves in it and it's usually cut at an angle when it's removed from the vine.  Using the glue gun, I melted grooves down the length of the stick, turning and melting until the sides were no longer smooth.  Working on what will be the exposed end, I pushed the tip of the gun into the end of the stuck and began pulling the melted glue out at an angle.  It leaves little wispy curls which is perfect as the pumpkin has little tendrils near the stem too.  Now, spray paint it with silver paint and glue it (using the glue gun loaded with a glue stick) to the top. (UPDATED:  I added these two photos to help explain how I did the stem.)


The last thing I needed to do was to make some leaves.  I had already cut out some book page leaves for another project so I tried those and I really liked the combination.  Ready to see the two pumpkins together?


I hope you give these a try.  I paid $.99 for each globe and had the other items on hand.  If you purchase the Looking Glass paint, it is somewhat costly but it goes a long way!  

Thanks for stopping by and God bless!
Angie

Here's a photo for Pinterest if you'd like to pin it.  I'd appreciate it!!


Join me here:  


I'm linking here:
THE STYLE SISTERS
JENNIFER RIZZO
HOME STORIES A TO Z
FROM MY FRONT PORCH TO YOURS
HAVE A DAILY CUP OF MRS. OLSON
COASTAL CHARM'S NIFTY THRIFTY TUESDAY
STONEGABLE
UNDER THE TABLE AND DREAMING

Wednesday, September 3, 2014

After the Hunt Tablescape

outdoor hunt fall tablescape

Hello and welcome to this stop on the fall blog tour.  Our first week's theme is tablescape.  If you're popping over from The Striped House or Concord Cottage, I'm glad you're here!  If you missed the first two posts, you can check them out at The Striped House and Concord Cottage.

My tablescape is a little out of the box.  I wanted to do a hunt version of a tailgate picnic.  I've always loved plaids and tartan prints so pulling this together was pretty easy from things I had around the house.  Warning:  this post is loaded with photos so you may want to grab a cup of coffee before we get started.

Ready?  Good, let's go!


This is set in my back field (which looks prettier in photos thanks to strategic staging!)  I used an old farm table along with two folding camp stools for the dining area.  Everything, except for the Tilley hat, came from thrift stores.  I pick up plaid wool throws whenever I find them.


The tailgate of our old (early 80s) truck was used for a serving area.  You may notice my DIY pendant lights that I posted about here.


Did you know you can check with local wine and liquor stores to see if they have any wooden boxes??  I check one frequently in my area.  He's always glad to pass along any he has sitting around.  The Jack Daniels box was a display box that originally had clear plexiglass in the front.  I removed the plexiglass and painted it on the reverse side with #Krylon Looking Glass paint.  I love that stuff!  And, I love how the box turned out.  It reminds me of a vintage bar mirror.


I also hoard, uh, collect vintage plaid thermos and picnicware.  (I also have a blue plaid set just for tailgating at my daughter's college)  :)


The fowl barware glasses are a set I picked up at the thrift store, along with the decanter.  There is actually something in the decanter but I used gin, which happens to be clear.  Bad planning.  (I actually have to interject here...I love vintage barware and an occasional fruity drink but gin...blech! Sorry gin drinkers.  I'm not sure why we had gin in the first place so I wasn't too upset to pour it out after this.) 


The bamboo cane...$1 at the thrift store.  I'm telling you, if you don't shop thrift stores, you're missing some great stuff!


You've got to have your compass when hunting...as well as a bug book and magnifying glass.  Ok, maybe some serious hunters out there would leave the bug book and magnifying glass behind.


Soup and chili are two great tailgating dishes.  Use a variety of thermoses and attach labels with the contents.


The old crock jar holding the vintage silverware belonged to my grandparents.


The sun was just about to set but it was making for some great last minute photos before the light was gone.


I hope you enjoyed tailgating after the hunt.  Here's an easy to Pin version to save on Pinterest for later!


Be sure to continue the Fall Tour tomorrow and see the great tablescape Vicki and Jennifer of 2 Bees in a Pod share!!

Thanks for stopping by and God bless!!

Angie

I'm linking here:
THE STYLE SISTERS
JENNIFER RIZZO
HOME STORIES A TO Z
FROM MY FRONT PORCH TO YOURS
HAVE A DAILY CUP OF MRS. OLSON
COASTAL CHARM'S NIFTY THRIFTY TUESDAY
STONEGABLE
UNDER THE TABLE AND DREAMING

Tuesday, September 2, 2014

DIY Pendant Lights from Chimney Caps

junk picking, DIY, pendant lights


A few weeks ago, I went picking at one of my favorite spots.  I came across these galvanized chimney caps.  I thought they would make great pendant lights.

After a trip to my local Home Depot, I came back with the 12 feet of silver lamp cord, 2 switches, and 2 easy plugs.

lamp cord switch from homedepot.com
DIY lamp kit from homedepot.com
Now, the above photo is a kit.  I had a few parts already so I just needed the cord and plugs.  Since the chimney caps were galvanized steel, I didn't want to use a brass bulb base  so I recycled 2 black bases from old broken lamps.  Also, if you've never rewired a lamp, it's super easy.  Ask the guys in Home Depot's lighting department.  You'll be surprised how easy it is and then you'll want to make lamps from everything! ;)


I drilled a hole into the top of the cap and used a threaded stem and nut to put the lamp cord through.


I didn't want the threaded stem to be exposed so I found a couple of springs in my junk stash that fit perfectly.


Since the black bulb bases had exposed wires that I didn't want touching the metal of the chimney cap, I ran back to the hardware store to find something that would insulate the bases.  Solution:  two rubber tips (stoppers, I call them) that are used on the bottom of chair legs.  Perfect!

Ready to try them out!  Quickly hung one in the garage and plugged it in.


It works!  Yes, I'm always surprised when things I attempt actually work, lol!  I made a matching pair and they both worked great.


Here's a little teaser of how I used them for Wednesday's Fall Tablescape post.  Be sure to check back tomorrow to see the full post.

Have you made lamps out of found objects?  Let me know!  I hope you were inspired to try.  Thanks for stopping by and God bless!

Angie

Note:  The two images of lamp switches and lamp kit are from HomeDepot.com but are not linked.  The Home Depot sidebar ad is an affiliate link.  

I'm linking here:
THE STYLE SISTERS
JENNIFER RIZZO
HOME STORIES A TO Z
FROM MY FRONT PORCH TO YOURS
HAVE A DAILY CUP OF MRS. OLSON
COASTAL CHARM'S NIFTY THRIFTY TUESDAY
STONEGABLE
UNDER THE TABLE AND DREAMING

Monday, September 1, 2014

Touring Through Blogland

Hi all!  I hope you're enjoying the Labor Day Weekend.  I am especially since fall is my favorite season.


My sweet, talented friend, Coco, at the Crowned Goat, asked me to participate in Touring through Blogland.  So, if you're visiting from Coco's blog, welcome!

My sweet friend, CoCo!  Isn't she cute?!

This tour has been going for many weeks now and I was so excited when Coco asked me to join.

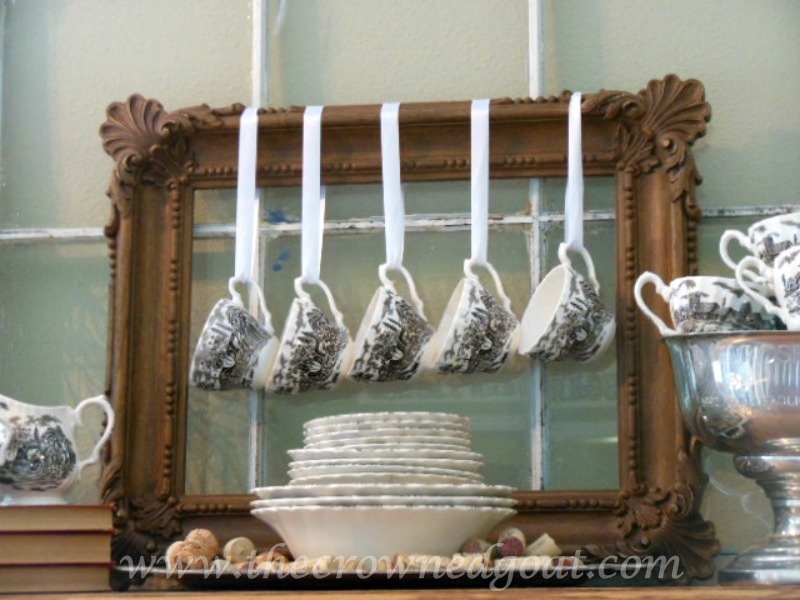
Love her creative way of displaying teacups...totally stealing this idea!


I'll be sharing a little bit about me and answering 4 questions about what goes into creating The Altered Past posts.  At the end, I'll be sending you to another talented blogger to keep the tour going.


A Little About Me


Wife to my best friend for the past 25 years, mom to our 3 beautiful daughters, 15, 17, and 23 that I've home schooled (well, finishing up with the third one...only 3 years to go), director of a local home school tutorial, and a DIY/thrift store shopping/repurposing stuff/artsy blogger.  Over the past few years, I had been trying to decide what to do once all of our girls have graduated.  Blogging came to be the natural choice.  So, The Altered Past was birthed, in 2009, as a way for me to share my altered art creations with others.  From there, it has evolved into sharing everything from my art, decorating with thrift store finds, repurposing and revamping things.  What all of these things have in common is that they began as one thing and are made into something new...making the old new again. :)


What Am I Working On Right Now?

In short, everything!  Well, maybe it just feels that way.  I've always got several projects going at once.  I think it has something to do with being a creative person.  Or, maybe I'm just easily distracted.  Right now, I am making seat and back cushion inserts for 4 chrome chair frames that I found at the metal scrap yard.  After wasting millions of staples and throwing one staple gun in the garbage, I finally finished one...ONE chair.  I have a love/hate relationship with staple guns right now.  A trip to Home Depot for a new staple gun and the second chair was done.  Thank God!


So, on to the next project, I am finishing up my small work room that my hubby built for me in our basement garage.  It's tiny and I have SO much stuff so it's a work in progress for now.  And, lastly, I'm preparing to decorate our home for a fall home tour post.  


How Does My Work Differ From Others in this Genre?
I guess I'd have to say that just as we are all different individuals, our perspectives, our likes, our talents, our situations all play a role in our work.  My work is influenced by what I have on hand or can obtain inexpensively from yard sales, thrift stores, or antique malls.  I tend to look at things beyond what they were intended for and try to see what else they could be, like the vintage silverware snowflakes that I used in our kitchen window last Christmas.  Viewing things in this way causes me to see value in almost everything.  That may also be the mentality of a hoarder so don't mention this to my husband!  

How Does Your Creative Process Work?
As for my actual blog posts, um...I usually write it right before I need to post it.  Organization is obviously a left brain function.  Pre-written? Scheduled?  What?

As for my projects, some of this I answered above.  My other answer to this would be sort of cliche.  Ready?  I let the object/room speak to me.  I know, I'm sorry.  It is cliche.  Maybe a more accurate answer would be that it let's me know when it's not right.  If I'm decorating a room, I begin with a plan for its function and then begin to build what furniture pieces I have to work with and consider anything that can be used in a different way.  From there, I fill in with decorative items, trying to find a satisfying balance with their placement.  It's really basic.  Now, with my artistic pieces (back in the older days of The Altered Past), the objects did seem to give clues as to what they should be, like my JoBots (Junk Object Robots) or my vintage bottle snowmen that I've made.  Other than those two processes, I spend a lot of time gathering inspiration from the many talented bloggers and DIYers on the internet.

"George" the JoBot
"Joey" a Vintage Bottle Snowman

Why Do I Create What I Do?
I love this question.  Our Sunday School class has been examining how to live by being who we were created to be.  During this, I realized I have to create.  I love to create.  Whether I have a need for the item I am creating or not, I just love to create.  If you have children, I think you will agree with me when I say you can see certain parts of your personality in each of them, sometimes one part will be more dominant than another.  Just as we are created in God's image, we have received parts of His personality that are stronger in one area than another.  Some are stronger in compassion, some in nurturing, some in giving, some in creating.  I got a strong dose of creating.  ;)  I create what I do to meet a need or a specific function or to tackle a challenge.
This is a photo of my old work space AFTER I had finished a project.

How Does Your Creating Process Work?
I'm a right-brain person. So, when I'm creating, I'm usually oblivious to time.  It's probably the one and only time that I am focusing on one thing.  The process is usually messy too.  I pull out tools and supplies as I go along.  I've even worked myself into a tiny 1 square foot of table space (read about it here) while creating once.  Sometimes I may not know what it is I'm looking for but if I happen to see it I know it, so I have to have all of my supplies visible too.  That may be a sign of a hoarder too.  I'd better quit now.
I'm so glad you stopped by and I hope you will continue the blogland tour next Monday over at The Striped House!


Say hi to Jennifer and be prepared to be blown away by her talent!

Thanks and God bless!
Angie